Back to 4. It’s all about users, permissions, modules and articles
Creating content is hard! Every piece of content is a story. And a story can be good or not that good and thus attracting visitors or bore them. Thousands of books on the subject of writing stories have been published, a lot of people have taught the lore. I have a relatively easy task to cover just the technical part :)
What is an article in Joomla?
Technically, an article consists of
- a title (headline) and an alias (in the url)
- the text (a mixture of text, images, and other media)
- a category where the article belongs to
- additional tags to describe the article
- an author and an alias for the author
- access permissions
- a language the article is written in
- meta data for search engines and other robots
and a lot of options how, where, to whom and when the article is displayed.
You already wrote an article in the last chapter and this was not complicated. Just a title is necessary, all the other fields have a default value or are optional.
Let’s go through this list :)
A Title
It’s a little, but an important part.
- It needs to be crisp and short to attracts readers and it’s handy for you because the title appear in lists of articles on the website and as lists of articles in the control panel.
- the title appears as the page title on top of your browser window and it can contain the site name too. You can configure this behaviour in System → Global Configuration → Site → SEO settings → Include Site Name in Page Titles
- it can appear in the URL of that page and it’s up to you how to setup the URL System → Global configuration → Site → SEO settings.
The Text
In Joomla, the text of your article contains a part that is displayed in lists (teaser) and the rest of the article. This rest can be structured by page breaks, so that a long text results in 10 pages each with a table of content. But step by step :).
When you create an article you will do this with the help of an editor. Joomla uses a rich text editor (TinyMCE). That means, it is not necessary for you as the author to learn HTML tags. The editor looks like a text processor window on your PC (e.g. Word, LibreOffice) and it is easy to understand the icons (Figure 1).
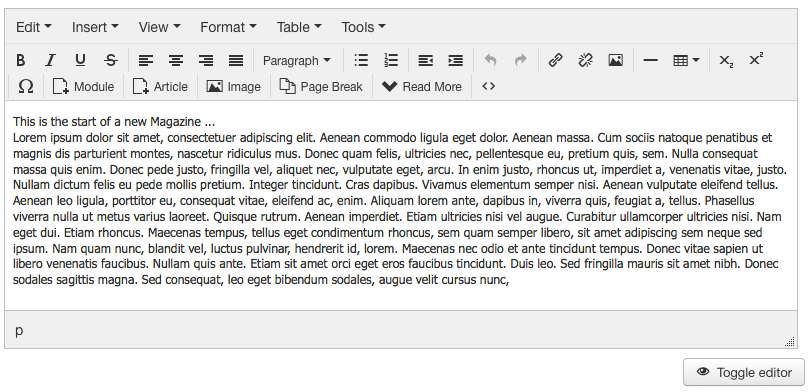
If you hover over an icon with your mouse, there appears a tooltip with the description of the function the editor performs when the icon is clicked on
Note:
It is possible to install different editors, for example the Joomla Content Editor and it is also possible not to use any editor. Joomla itself comes with two editors and you can configure the default editor in System → Global Configuration → Site → Default Editor.
The default settings allow your users to choose between the available editors by themselves in their user account. You can disable this feature in Users → Manage → Options → Frontend User Parameters.
Paste from Word
The worst case of editing happens, when people paste from programs like Microsoft Word. Even if the situation gets better there is still NO REAL WAY to get the same formats on a website that is based on HTML by pasting from a text processor like Microsoft Word that is based on binary formats or “complicated” XML. The editor offers a “Clean up messy code” icon but it will not clean up logical errors or differences in the markup. Please keep that in mind when you talk to your users :)
Insert Images
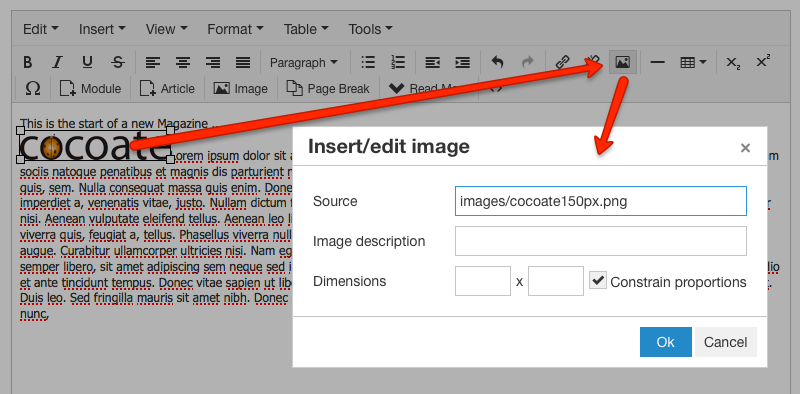
In the third row of the editor window you’ll find a button called images. It offers a dialog to choose existing images from your inbuild Joomla image library and it allows you to add images to this library by uploading them.
- You can manage your library under Content → Media
- You can drag images in the content window of the editor.
- Joomla! will NOT resize your images, so be careful with big photos!
The best solution: your images have exactly the size in pixel you want to have them on your site. There are several extensions available for solving the resize issue and the Twitter Bootstrap framework that is used in Joomla 3.x, is helpful for responsive images.
After you have inserted an image from the library, you can configure (add attributes to) that image by clicking the image icon on top of the rich text editor (Figure 2).
References to other articles
The button Article in the third row of the editor window allows to link from an article to another article which is quite useful. This feature requires the Editor group permission.
Read more
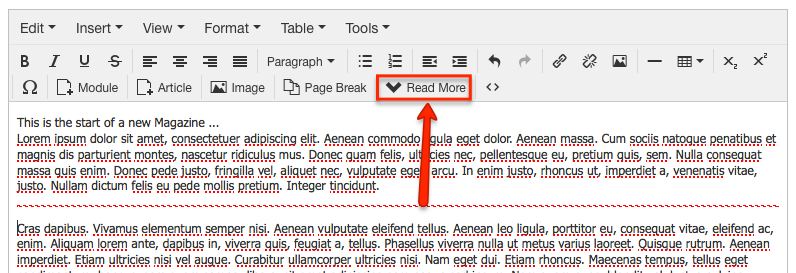
Articles will appear in lists and on an article details page. On lists, the text should be limited to avoid confusion. With the help of the Read More button you limit the article text. Set the cursor in your text where the Read More break should appear and click the Read More button (Figure 3).
Embed a YouTube video
This is not only about YouTube videos but it is a good example for text filters. If you try to embed a YouTube video with the typical code
<iframe width="420" height="315" src="https://www.youtube-nocookie.com/embed/UF8uR6Z6KLc" frameborder="0" allowfullscreen></iframe>
you notice that it is filtered by the editor and by Joomla. This is not a bug! It’s a feature :)
For security reasons
Joomla uses so-called text filters (System → Global Configuration → Text Filters) to filter the following tags: ‘applet’, ‘body’, ‘bgsound’, ‘base’, ‘basefont’, ’embed’, ‘frame’, ‘frameset’, ‘head’, ‘html’, ‘id’, ‘iframe’, ‘ilayer’, ‘layer’, ‘link’, ‘meta’, ‘name’, ‘object’, ‘script’, ‘style’, ‘title’, ‘xml’.
Unfortunately, we need to insert an <iframe> tag to embed videos from YouTube (and several other services).
So, how can the problem be solved?
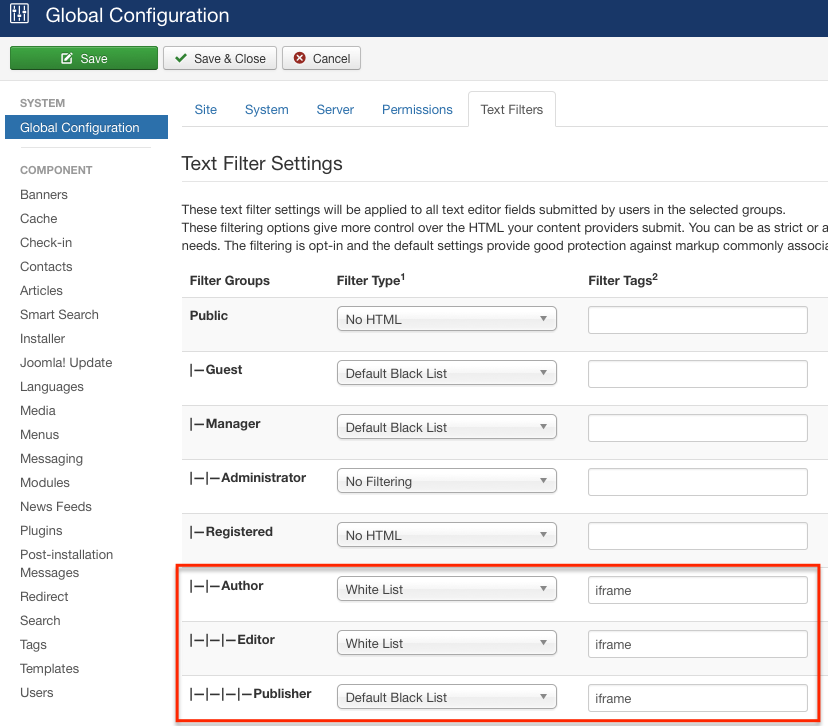
One solution could be to trust your authors and create a White List (System → Global Configuration → Text Filters) for the authors, editors and publishers group (Figure 4) and then tell TinyMCE the <iframe> is not evil anymore (Extensions → Plug-in Manager → Editor-TinyMCE → Edit → Plugin → Prohibited Elements) by deleting the word iframe in the prohibited elements field.
After you have changed these filter mechanisms, it is possible to copy and paste the embed code into your article. Keep in mind that you need to switch the editor to the HTML view by clicking the HTML source code icon (<>). Afterwards, a popup window with the HTML code of the article appears. Now paste the embed code where the video should appear (Figure 5).
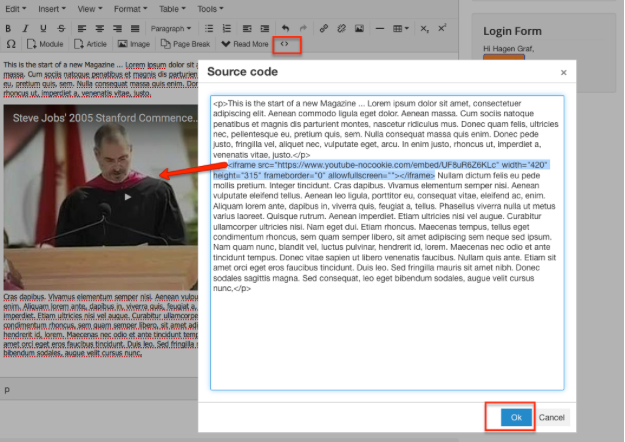
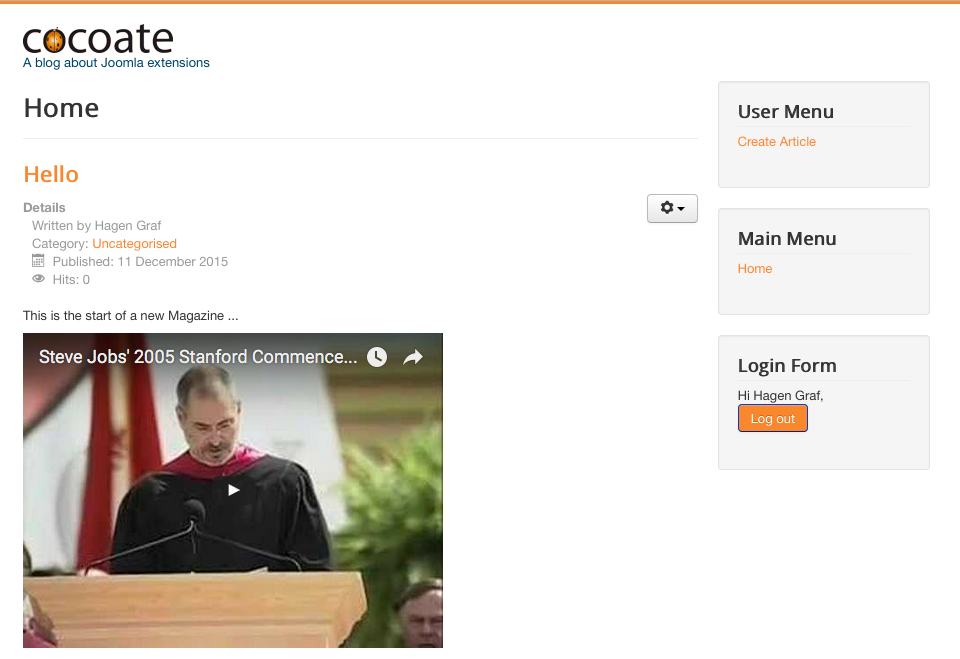
Click the Ok button and you already can see the video inside the editor window. After saving the article the video will appear on your website (Figure 6).
Now you can embed code from several platforms like Twitter, Facebook, Instagram and Flickr.
Using macros in a text
It is possible to use so called macros in your text. A macro is an expression or command that is replaced with something different (e.g the embed code of your YouTube video). Theoretically, we could write in our article text (not in the HTML) something like this
[youtube = http://www.youtube.com/watch?v=rX372ZwXOEM]
and some magic could replace this with the appropriate embed code
<iframe width=”560″ height=”315″ src=”http://www.youtube.com/embed/rX372ZwXOEM [105]” frameborder=”0″ allowfullscreen></iframe>
The only problem is that this transformation is not a part of the Joomla core package. If you want to use macros, you need to install additional extensions, mostly so called plug ins.
Content in a module?
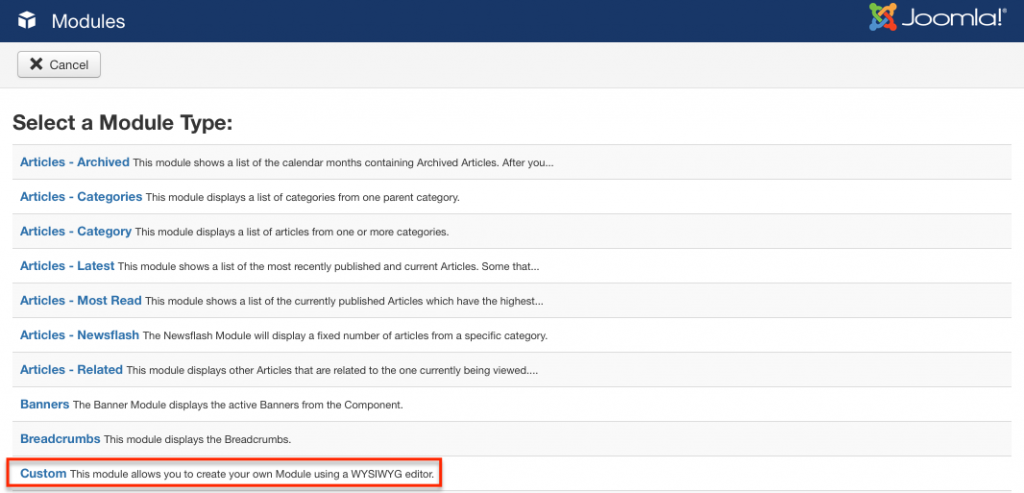
When we created an article, we used the content component of Joomla. Another possibility to create content can be a module. A module is a content element that can be positioned on your website. A menu, for example, needs a module to be displayed. The Login box is also a module. You can create as many modules with predefined functions as you need and position them in the predefined area in the template. Joomla comes with 24 pre-installed modules. You can see them with descriptions under Extensions → Modules → New (Figure 7).
It is possible to create a module that contains HTML text like an article (Custom module). And it is also possible to upload e.g. a background image for each module and to publish the module time based. It is not intended that custom HTML content in modules is created by “normal” authors. Content creation in modules is more a “Manager” or “Administrator” task. Try out the Custom HTML module. Create one, add some content and choose a position (Figure 8).
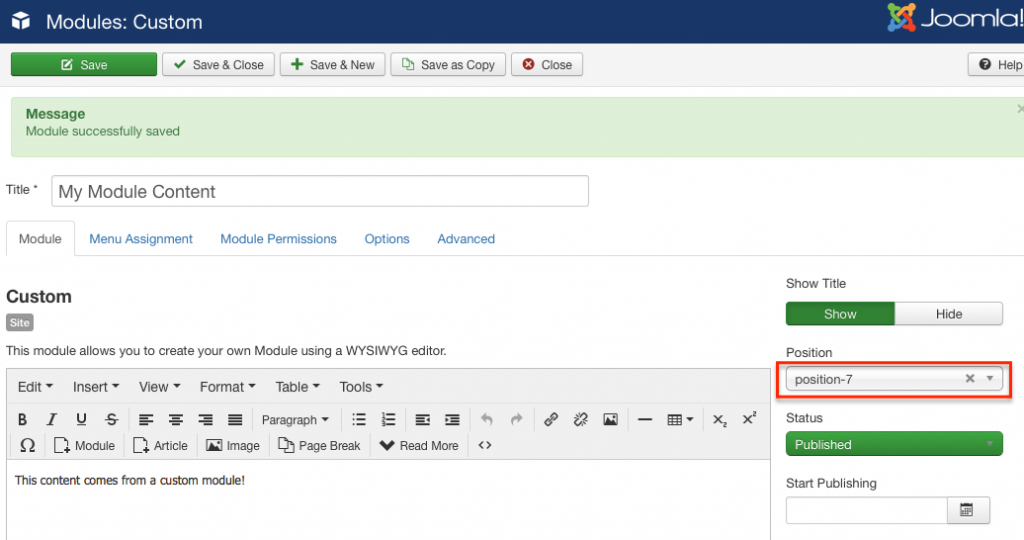
You can use the rich text editor and all the features that are available to write, format and enhance article text. You can even configure on which page the module should appear (tab Menu Assignment) and when it should appear (time based publishing). After saving, your custom HTML module appears on your site (Figure 9).
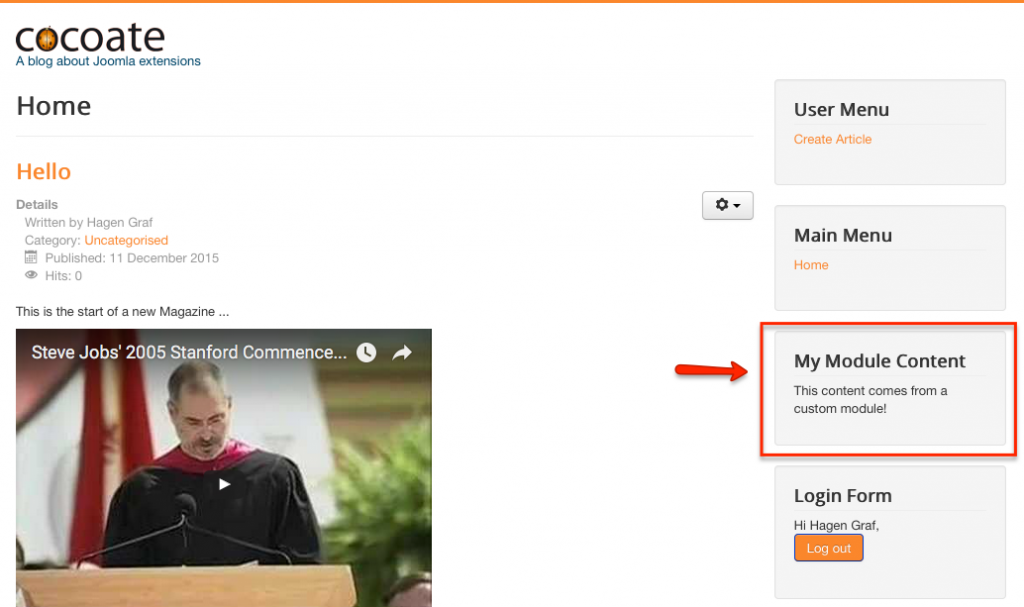
Figure 9: Custom HTML module on website
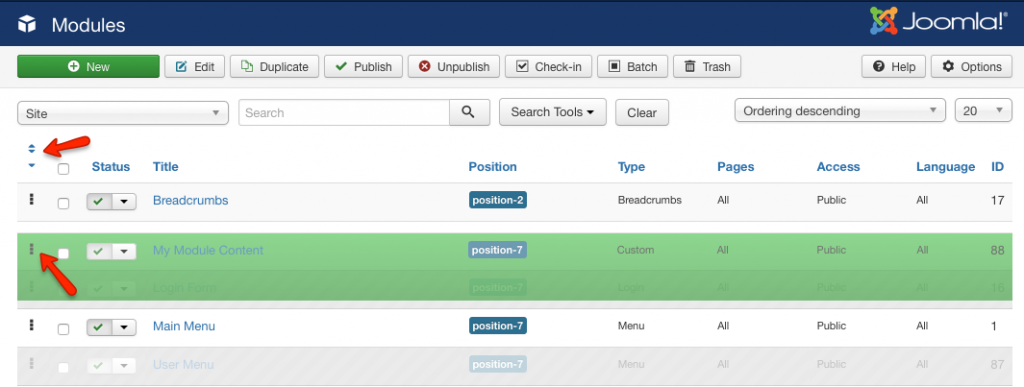
If more than one module is located at the same position it is necessary to bring them into the desired order. You have to choose a filter and click the filter icons once. After that, just drag the modules in the module manager to the desired place (Figure 10).
next chapter: 6. Display Content
Leave a Reply